DIY Project – Monitor and Control Weather Station with Telegram App
ESP32 based weather Station in which Sensor Readings can be fetched and Outputs can be controlled from anywhere using Telegram Application
Story
In this project we’ve build Weather Station which keeps record of meteorological parameters. It measures atmospheric conditions to provide information for weather forecasts and to study the weather and climate.
We’ll add a feature to this weather station which makes it to be accessed and controlled from anywhere from the world. We’ll create Telegram Bot for our Weather Station and program it to get interact and give responses about sensor readings and relay outputs whenever we will contact it using telegram Application from our Smartphone or from PC.
So you just need to send a message to your Telegram Bot to monitor/Control your sensors/Outputs from anywhere in the world.
What are Telegram Bots ?
To Interact with weather station system and get notified about all the parameters we need to create Telegram Bot on Telegram Application in our smartphone.
“Bots are third-party applications that run inside Telegram. Users can interact with bots by sending them messages, commands and inline requests. You control your bots using HTTPS requests to our Bot API.”
you can check out more info about bots on Telegram Website – https://core.telegram.org/bots
Objective of the Project
In this Weather station project we’re going to monitor
- Temperature
- Humidity
- Atmospheric Pressure
- Altitude
For that we’ll use
- DHT22 Temperature and Humidity Sensor
- BMP280 Temperature, Atmospheric Pressure and Altitude Sensor
Functional Block Diagram
Following image shows block diagram of the project
Working
- As shown in above block diagram DHT22 and BMP280 Sensors fed (Temperature, Humidity, Atmospheric Pressure and Altitude) Readings to ESP32 Development Board
- The ESP32 Development Board is WiFi enabled which can connect to wireless router which is further connected to Internet.
- You’ll create and program Telegram bot for your ESP32 board;
- You can start a conversation with that bot.
- When you send the message /readings to the bot, the ESP board receives the message and responds with the current meteorological parameters.
- You can send the /start message to receive a welcome message with the commands to control the board.
- We’ve also implemented commands to control the Outputs of ESP32 like turning relays ON/OFF.
- So in this way if you have Smartphone with internet connectivity, and you are authorized user then you can monitor and control this weather station from anywhere from world using Telegram App
Hardware
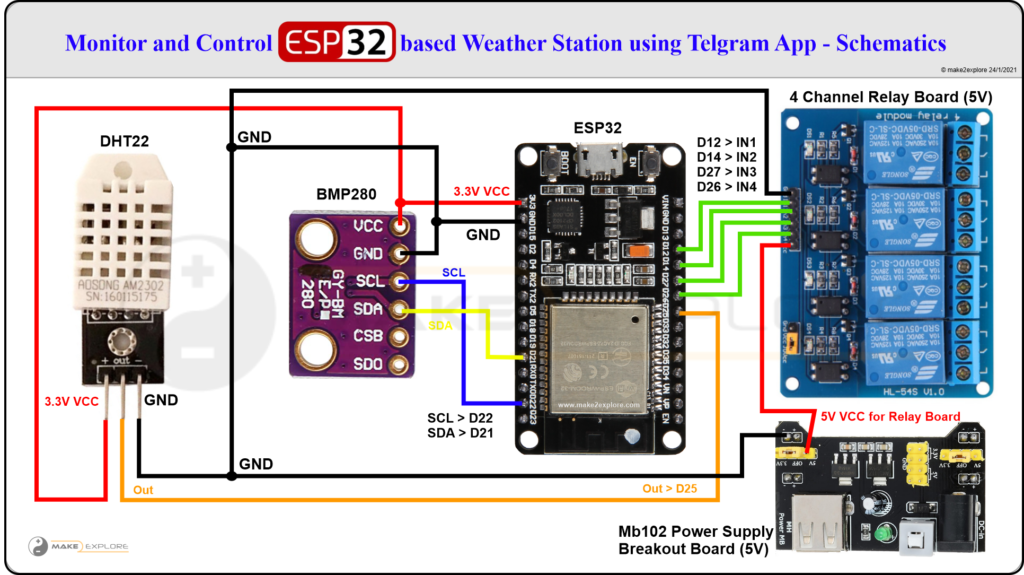
We’ll require following components to build this project on breadboard. The circuit diagram or schematics of the project is given below or you can also get it on our GitHub
Parts Required
- NodeMCU ESP32s Development Board
- DHT22 Temperature and Humidity Sensor Module
- BMP280 Temperature and Pressure Sensor
- Four Channel Relay Board
- MB102 Breadboard Power Supply module
- 12V DC Fan
- Batteries – 11.1V LiPo and 7.4V LiPo
Schematics
Software
Stage 1 – In software setup, You need to complete following four steps
1. We need Telegram Application to be Installed on our smartphone.
2. Get Your Telegram Chat ID –
- Why ? – To chat with an Authorized User ESPCAM needs USER ID / CHAT ID of our Telegram
- Because anyone that knows your bot username can interact with it. To make sure that we ignore such spam messages that are not from our Telegram account (or any authorized users). We need to get our Telegram Chat ID.
- Whenever your telegram bot receives a message, the ESP CAM Board can check whether the sender ID corresponds to your User ID and if it is correct then and then only it handle the message.
3. Create Telegram Bot –
- Create Telegram bot for our Home Security Application/Project
- Chat with Masterbot named “BotFather” to create a new bot
4. Get Bot Token –
- When you create new bot – “BotFather” will issue a new bot token for your bot
- Save the bot token because you’ll need it later (to Enter it in code) so that the ESP32 CAM can interact with the bot.
Stage 2
We’ll program the ESP32 board using Arduino IDE, so make sure you have it installed in your Arduino IDE. You can check out following video for that, there we have explained in detail about how to install ESP boards into an Arduino IDE
Stage 3
Installing Libraries
For this project you need to install several libraries.
==> Telegram Bot Library, ArduinoJson Library, BMP280 and DHT sensor library
The following libraries can be installed through the Arduino Library Manager. Go to Sketch > Include Library> Manage Libraries and search for the library name.
- DHT library: Adafruit DHT Sensor library
- BMP280 libraries: Adafruit_BMP280 library and Adafruit unified sensor library
- ArduinoJson Library : you also have to install the ArduinoJson library
==> Universal Telegram Bot Library
To interact with the Telegram bot, we’ll use the Universal Telegram Bot Library created by Brian Lough that provides an easy interface for the Telegram Bot API.
Follow the next steps to install the latest release of the library.
- Click here to download the Universal Arduino Telegram Bot library.
- Go to Sketch > Include Library > Add.ZIP Library…
- Add the library you’ve just downloaded.
Important Note: don’t install the library through the Arduino Library Manager because it might get install a deprecated version.
For all the details about the library, take a look at the Universal Arduino Telegram Bot Library GitHub page.
Stage 4
Code of the project is given below, with libraries. It is also available on our GitHub. We have explained code in following video, check out to learn more.
// ------------------- blog.make2explore.com---------------------------------------------------------------//
// Project           - ESP32 Weather Station + Telegram
// Created By        - [email protected]
// Version - 1.0
// Software          - C/C++, Arduino IDE, Libraries
// Hardware          - NODEMCU ESP32s, BMP280 Sensor, DHT22 Sensor, 4Channel Relay Module(5V)
// Sensors Used      - BMP280 Atm Pressure Sensor, DHT22 Temperature Humidity Sensor
// Last Modified     - 16/01/2021 21:44:00
// -------------------------------------------------------------------------------------------------------//

#include <WiFi.h>
#include <WiFiClientSecure.h>
#include <UniversalTelegramBot.h> // Universal Telegram Bot Library written by Brian Lough
#include <ArduinoJson.h>

#include <Wire.h>
#include <Adafruit_Sensor.h>
#include <DHT.h>                 // DHT Sensor Library
#include <Adafruit_BMP280.h>     // BMP280 Sensor Library

#define DHTTYPE  DHT22           // Type of DHT Sensor DHT22 (AM2302)
#define DHTPIN 25                // Digital pin connected to the DHT sensor
DHT dht(DHTPIN, DHTTYPE);        // creating dht Instance

// BMP280 connect to ESP32 I2C (GPIO 21 = SDA, GPIO 22 = SCL)
Adafruit_BMP280 bmp;             // Create bmp instance

// Replace with your network credentials
const char* ssid = "XXXXXXX";
const char* password = "XXXXXXX";

// Use @myidbot to find out the chat ID of an individual or a group
// Also note that you need to click "start" on a bot before it can
// message you

#define CHAT_ID "XXXXXXXXXX"     // Your Chat ID

// Initialize Telegram BOT
#define BOTtoken "XXXXXXXXXX:YYYYYYYYYYYYYYYYYYYYYYY"  // your Bot Token (Got from Botfather)

WiFiClientSecure client;
UniversalTelegramBot bot(BOTtoken, client);

//Checks for new messages every 1 second.
int botRequestDelay = 1000;
unsigned long lastTimeBotRan;

const int Relay1 = 26;           // Relay Pins Connected to GPIO's
bool Relay1State = HIGH;

const int Relay2 = 27;
bool Relay2State = HIGH;

const int Relay3 = 14;
bool Relay3State = HIGH;

const int Relay4 = 12;
bool Relay4State = HIGH;

// Get BMP280 & DHT22 sensor readings and return them as a String variable
  String getReadings(){
  float temperature, humidity, pressure, Altitude, heatIndex;
  temperature = dht.readTemperature();
  humidity = dht.readHumidity();
  pressure = (bmp.readPressure())/133;
  Altitude = bmp.readAltitude(1012);
  heatIndex = dht.computeHeatIndex(temperature, humidity, false);

  String message = "Temperature: " + String(temperature) + " ºC \n\n";
  message += "Humidity: " + String (humidity) + " % \n\n";
  message += "Pressure: " + String (pressure) + " mmHg \n\n";
  message += "Altitude: " + String (Altitude) + " m \n\n";
  message += "Heat Index: " + String (heatIndex) + " ºC \n\n";
  return message;
}


//Handle what happens when you receive new messages
void handleNewMessages(int numNewMessages) {
  Serial.println("handleNewMessages");
  Serial.println(String(numNewMessages));

  for (int i=0; i<numNewMessages; i++) {
    // Chat id of the requester
    String chat_id = String(bot.messages[i].chat_id);
    if (chat_id != CHAT_ID){
      bot.sendMessage(chat_id, "Unauthorized user", "");
      continue;
    }

    // Print the received message
    String text = bot.messages[i].text;
    Serial.println(text);

    String from_name = bot.messages[i].from_name;

    if (text == "/start") {
      String welcome = "Welcome, " + from_name + ".\n\n";
      welcome += "Use the following command to get Weather Station current readings.\n\n";
      welcome += "/readings \n\n";
      welcome += "Use the following command to Control The Appliances.\n\n";
      welcome += "/relay1_ON or /relay1_OFF \n";
      welcome += "/relay2_ON or /relay2_OFF \n";
      welcome += "/relay3_ON or /relay3_OFF \n";
      welcome += "/relay4_ON or /relay4_OFF \n\n";
      welcome += "/all_Relay_ON or /all_Relay_OFF \n\n";
      welcome += "/RelayStatus For Status of Relays \n\n";
      bot.sendMessage(chat_id, welcome, "");
    }

    if (text == "/readings") {
      String readings = getReadings();
      bot.sendMessage(chat_id, readings, "");
    }

    if (text == "/relay1_ON") {
      bot.sendMessage(chat_id, "Relay1 State set to ON", "");
      Relay1State = LOW;
      digitalWrite(Relay1, Relay1State);
    }

    if (text == "/relay1_OFF") {
      bot.sendMessage(chat_id, "Relay1 State set to OFF", "");
      Relay1State = HIGH;
      digitalWrite(Relay1, Relay1State);
    }


    if (text == "/relay2_ON") {
      bot.sendMessage(chat_id, "Relay2 State set to ON", "");
      Relay2State = LOW;
      digitalWrite(Relay2, Relay2State);
    }

    if (text == "/relay2_OFF") {
      bot.sendMessage(chat_id, "Relay2 State set to OFF", "");
      Relay2State = HIGH;
      digitalWrite(Relay2, Relay2State);
    }


    if (text == "/relay3_ON") {
      bot.sendMessage(chat_id, "Relay3 State set to ON", "");
      Relay3State = LOW;
      digitalWrite(Relay3, Relay3State);
    }

    if (text == "/relay3_OFF") {
      bot.sendMessage(chat_id, "Relay3 State set to OFF", "");
      Relay3State = HIGH;
      digitalWrite(Relay3, Relay3State);
    }


    if (text == "/relay4_ON") {
      bot.sendMessage(chat_id, "Relay4 State set to ON", "");
      Relay4State = LOW;
      digitalWrite(Relay4, Relay4State);
    }

    if (text == "/relay4_OFF") {
      bot.sendMessage(chat_id, "Relay4 State set to OFF", "");
      Relay4State = HIGH;
      digitalWrite(Relay4, Relay4State);
    }

    if (text == "/all_Relay_ON") {
      bot.sendMessage(chat_id, "All Relay State set to ON", "");
      digitalWrite(Relay1, LOW);
      digitalWrite(Relay2, LOW);
      digitalWrite(Relay3, LOW);
      digitalWrite(Relay4, LOW);
    }

    if (text == "/all_Relay_OFF") {
      bot.sendMessage(chat_id, "All Relay State set to OFF", "");
      digitalWrite(Relay1, HIGH);
      digitalWrite(Relay2, HIGH);
      digitalWrite(Relay3, HIGH);
      digitalWrite(Relay4, HIGH);
    }

    //status command impl
    if (text == "/RelayStatus") {
      char buf[100]= "";
      unsigned int pins[] = {26, 27, 14, 12};
      unsigned int nums[] = {1, 2, 3, 4};
      for(int i=0;i<=3;i++)
      {
          if (digitalRead(pins[i])){
            sprintf(buf,"Relay %d is OFF \n",nums[i]);
          }
          else{
            sprintf(buf,"Relay %d is ON \n",nums[i]);
          }
          bot.sendMessage(chat_id, buf, "");
      }
    }

  }

}


void setup() {
  Serial.begin(115200);

  pinMode(Relay1, OUTPUT);             //define Relay pins as Digital OUT
  pinMode(Relay2, OUTPUT);
  pinMode(Relay3, OUTPUT);
  pinMode(Relay4, OUTPUT);

  digitalWrite(Relay1, Relay1State);   // Relay operate at inverted logic, so When RelayPin is "HIGH" Relay is Off
  digitalWrite(Relay2, Relay2State);   // When "LOW" Relay is On
  digitalWrite(Relay3, Relay3State);   // Here initially we make all relays Off
  digitalWrite(Relay4, Relay4State);

  // Init BMP280 sensor
  if (!bmp.begin(0x76)) {
    Serial.println("Could not find a valid BMP280 sensor, check wiring!");
    while (1);
  }

  // Init DHT22 sensor
  dht.begin();

  // Connect to Wi-Fi
  WiFi.mode(WIFI_STA);
  WiFi.begin(ssid, password);
  while (WiFi.status() != WL_CONNECTED) {
    delay(1000);
    Serial.println("Connecting to WiFi..");
  }
  // Print ESP32 Local IP Address
  Serial.println(WiFi.localIP());
  delay(5000);
}

void loop() {
  if (millis() > lastTimeBotRan + botRequestDelay)  {
    int numNewMessages = bot.getUpdates(bot.last_message_received + 1);

    while(numNewMessages) {
      Serial.println("got response");
      handleNewMessages(numNewMessages);
      numNewMessages = bot.getUpdates(bot.last_message_received + 1);
    }
    lastTimeBotRan = millis();
  }
}
Demo
Check out following video where we have explained detailed working of this project, its block diagram, schematics and Implementation. Finally you can also see the working demo of this project.