DIY Project – ESP32 LoRa Sensor Monitoring with Embedded Web Server

Monitoring Sensors (Temperature, Humidity and Pressure) via LoRa radio using Arduino MKR WAN 1300 and TTGO ESP32 LoRa running Web Server
Story
In this project, we’ve build a sensor monitoring system using a TTGO LoRa32 SX1276 OLED board that sends temperature, humidity and pressure readings via LoRa radio to two different receivers, one is TTGO ESP32 LoRa receiver1 and second is Arduino’s MKR WAN 1300 LoRa Development Board. The receiver1 displays the latest sensor readings on a web server. Before starting implementation of the project let us see brief introduction about LoRa Technology.
What is LoRa?
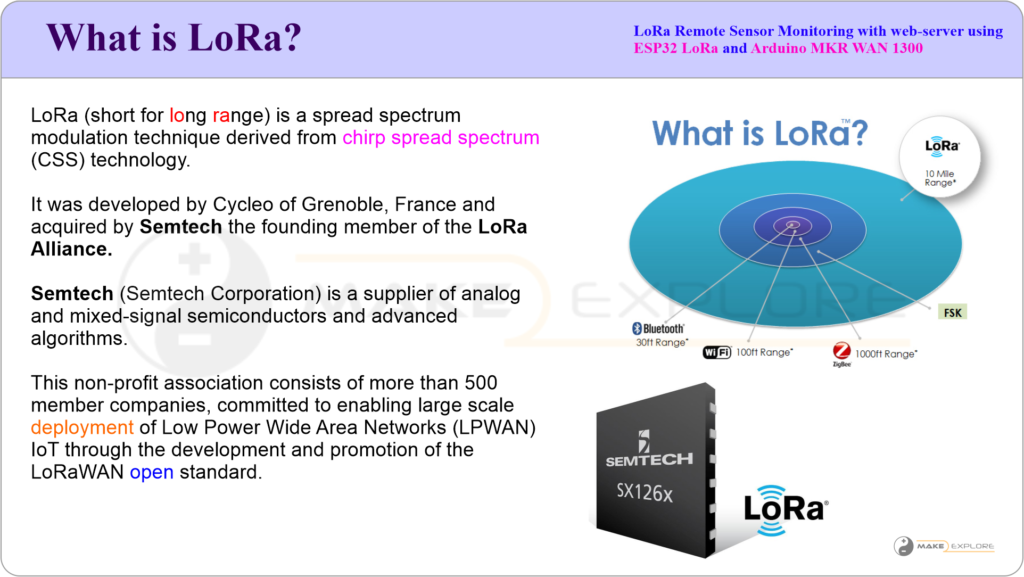
LoRa (short for Long Range) is a spread spectrum modulation technique derived from chirp spread spectrum (CSS) technology.
We have explained in detailed about LoRa Technology and its Features in following video, you can check that out
Objectives of the Project
In this project we’re going to monitor
- Temperature
- Humidity
- Atmospheric Pressure
- Altitude
For that we’ll use
- DHT22 Temperature and Humidity Sensor
- BMP280 Temperature, Atmospheric Pressure and Altitude Sens
For communication We’ll use
- TTGO ESP32 Development Board which is equipped with
- Sx1276 LoRa Trans-Receiver Module
- An Arduino MKRWAN 1300 LoRa Board
Functional Block Diagram of Project
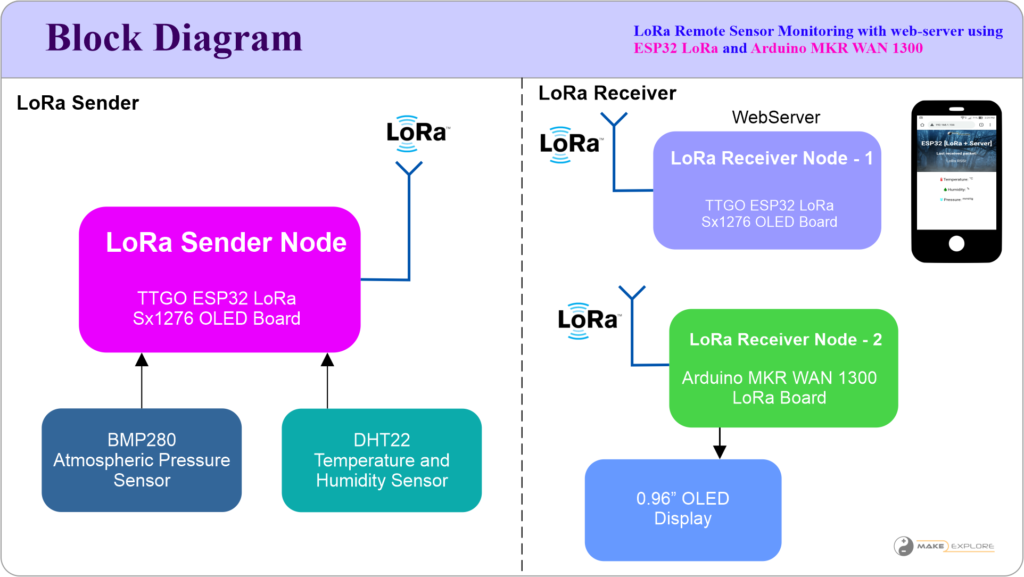
- LoRa Sender reads Sensors (BMP280 and DHT22) readings of (Temperature, Humidity and pressure), converts them in LoRa Packet format and send via LoRa radio every 10 seconds.
- We’ve used two different types of receiver nodes – LoRa Receiver node 1 – with TTGO ESP32 and LoRa Receiver node 2 – Arduino MKR WAN 1300.
- The LoRa Receiver node 1 has webserver deployed on it. It gets incoming LoRa packets and displays the received readings on an asynchronous web server also on OLED display. Besides the sensor readings, we also display the last time those readings were received and the RSSI (received signal strength indicator).
- The LoRa Receiver node 2 is simple receiver node with Arduino MKR WAN 1300 board It gets incoming LoRa packets and displays the received readings on OLED display.
Hardware
We’ll require following hardware components to assemble the circuitry
- Arduino LoRa MKR WAN1300
- TTGO LoRa ESP32 OLED Development Boards – 2 Nos
- BMP280 – Temperature and Atmospheric Pressure Sensor module
- DHT22 – Temperature and Humidity Sensor
- 0.96” OLED Display module
Schematics are given below or you can also go to our GitHub Repository
Schematics


Software
To program the TTGO LoRa32 SX1276 OLED boards we’ll use Arduino IDE. We’re going to deploy web sever on one of the receiver node i.e on Receiver Node 1 (TTGO LoRa32 Board).
- To upload the web server files into the ESP32 filesystem, we’ll use the ESP32 filesystem uploader plugin.
- So, before proceeding, you need to install the ESP32 package and the ESP32 filesystem uploader plugin in your Arduino IDE.
You can check out following videos for that, there we have explained in detail about how to install ESP boards into an Arduino IDE and how to install SPIFFS uploader plugin.
Installing Libraries
For this project you need to install several libraries.
==> LoRa, BMP280 and OLED Libraries
The following libraries can be installed through the Arduino Library Manager. Go to Sketch > Include Library> Manage Libraries and search for the library name.
- LoRa library: arduino-LoRa library by sandeep mistry
- OLED libraries: Adafruit_SSD1306 library and Adafruit_GFX library
- BMP280 libraries: Adafruit_BMP280 library and Adafruit unified sensor library
==> Asynchronous Web Server Libraries
To build the asynchronous web server, you also need to install the following libraries:
These libraries are not available to install through the Library Manager. So, you need to unzip the libraries and move them to the Arduino IDE installation libraries folder.
Alternatively, you can go to Arduino IDE Sketch > Include Library > Add.ZIP library… and select the libraries you’ve just downloaded.
Code of the Project </>
- ESP32 LoRa Sender Code – GitHub Link
- ESP32 LoRa Receiver Web Server Code – GitHub Link
- Arduino LoRaWAN Receiver Code – GitHub Link
Demo
Check out following video where we have explained detailed working of this project, its block diagram, schematics and Implementation of web server. Finally you can also see the working demo of this project.